Image Proccesor + KNN Classification Program
This project builds a basic image processing system and a KNN machine learning classifier from scratch.
🚀 How to Run the Project
✨ Core Modules and Functionalities
RGBImage Class
Defines the fundamental RGB image object using nested lists:
- Initializes 3D matrices representing pixels in
(row, column, [R,G,B])format. - Enforces strict type and shape validation with runtime exception handling.
- Supports controlled access to image data through getters/setters.
- Implements deep copying to maintain image immutability across transformations.
ImageProcessingTemplate Class
Provides a library of stateless, computationally efficient image transformations:
- Negate: Invert pixel intensities (
255 - intensity) across all color channels.
Example:
- Grayscale: Average RGB channels per pixel using floor division.
Example:
- Rotate 180°: Flip the image along both horizontal and vertical axes.
Example:
- Adjust Brightness: Add/subtract uniform intensity with clipping at
[0, 255].
Example:
- Blur: Smooth image using local neighborhood averaging.
Example:
StandardImageProcessing Class
Extends ImageProcessingTemplate with minor usage tracking:
- Inherits all transformation operations.
- Tracks the number of processing operations performed.
- Provides a coupon system to allow free operations temporarily.
PremiumImageProcessing Class
Extends the base functionality with additional advanced image manipulation operations:
- Tile: Repeats an image to fill larger dimensions using modular indexing.
Example:
- Sticker: Overlays a smaller image onto a background at a specified (x, y) coordinate.
Example:

- Edge Highlight: Applies a 3x3 Laplacian convolution filter to detect and highlight edges.
Example:

🧠 Image KNN Classifier Overview
K-Nearest Neighbors (KNN) is a classic machine learning algorithm commonly used for classification tasks.
It works under the principle that similar data points exist close together in feature space.
In this project, we apply KNN to classify images based on their raw pixel values.
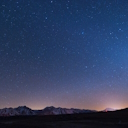
🌞🌙 Real-World Example: Classifying Day vs Night Images
This project follows a typical KNN workflow.
Imagine building a model to determine whether an image shows daytime or nighttime:
- Collect a dataset:
- Images labeled
"daytime" - Images labeled
"nighttime"
- Images labeled
- Classify a new image:
- Measure how similar the new image is to the labeled examples.
- Find the k closest images (nearest neighbors).
- Vote among them to predict the label.
This approach generalizes to any kind of image classification based on visual similarity.
🛠️ How the KNN Classifier Works in This Project
Step 1: Fitting the Model — fit(data)
- Purpose: Save labeled training data (images and labels) for future use.
- Input: List of
(image, label)pairs.
Step 2: Measuring Distance — distance(image1, image2)
- Purpose: Quantify how visually similar two images are.
- Method:
- Flatten each 3D RGB image matrix into a 1D list.
Compute the Euclidean distance between corresponding pixel intensities:
\[d(a, b) = \sqrt{(a_1-b_1)^2 + (a_2-b_2)^2 + \dots + (a_n-b_n)^2}\]- A smaller distance indicates higher similarity.
Image 1:

Image 2:
1
2
3
4
img1 = img_read_helper('img/steve.png')
img2 = img_read_helper('img/knn_test_img.png')
knn = ImageKNNClassifier(3)
knn.distance(img1, img2)
Step 3: Voting — vote(candidates)
- Purpose: Choose the most common label among the nearest neighbors.
- Input: A list of candidate labels (strings).
- Behavior:
- Returns the most frequent label.
- If there’s a tie, any of the majority labels may be selected.
Step 4: Predicting — predict(image)
- Purpose: Predict the label of a new image using the KNN method.
- Workflow:
- Compute distances to all stored training images.
- Sort the images by ascending distance.
- Select the top
k_neighbors. - Apply
vote()to predict the label based on the neighbors’ labels.
- Training Data:
- Training images are loaded from the
knn_data/folder. - Each image is labeled (e.g.,
"daytime","nighttime") and used for nearest neighbor comparisons.
- Training images are loaded from the
Example:
1
knn_tests('img/knn_test_img.png')
Output: nighttime
✅ Result: The model correctly predicted the image as nighttime!